Wednesday 15 November 2017

How to install .net framework 2.5 or 3.5 in Windows 10 from CD or DVD

Sometime when you trying to install an application like direct x or another in windows 10 it required .net frame & asking it for download from internet or windows update. For window update you required minimum 1 to 2 hours or best internet speed or if you trying to install from control panel with add/remove feature, still facing same issue. Then you can install .net from Windows 10 cd/dvd by following below steps:-

1. Enter the Microsoft Window 10 cd.dvd in dvd rom or you can also mount window 10 iso.
2. Open command prompt with administrator rights.
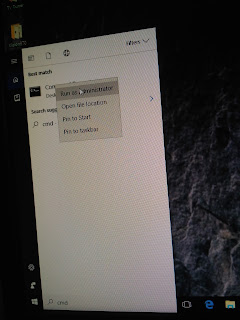
3. Press Window button+ R. It open a run window. Then please type cmd for command prompt or you can open command prompt by typing cmd in search as shown below image.


4. Type cmd in search, a command prompt desktop app will appear . Right click on command prompt window & run as administrator as shown below image.


6. Now you have an administrator rights for command prompt.

7. Now enter this command (dism /online /enable-feature /featurename:NetFX3 /All /Source:D:\sources\sxs /LimitAccess), please enter the right path of cd/dvd as shown below images.


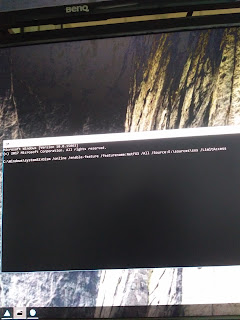
8.The installation of .net frame work will start as shown below image.


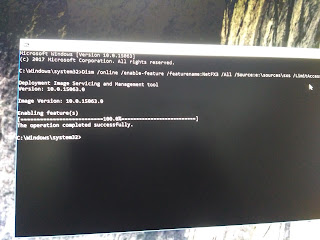
9. After the process of 2-3 minute installation will be completed as shown below image.


10. Thats it. Your .net framework is successfully installed.


Monday 25 September 2017

How to install nginx server in Ubuntu

Step 1: Install Nginx.

Install fresh Ubuntu from cd/dvd. After installation please follow below steps:-
1.            Right click on desktop to open terminal or ctrl+alt+t.
2.            Type command “sudo –i” & enter password (password will be invisible) for administrator rights.
2.            Type “sudo apt-get update
4.            Type “sudo apt-get install build-essential libpcre3 libpcre3-dev libssl-dev
5.            Type “wget http://nginx.org/download/nginx-1.13.1.tar.gz” for downloading nginx server.
6.            Type “wget https://github.com/arut/nginx-rtmp-module/archive/master.zip
7.            Type “tar -zxvf nginx-1.13.1.tar.gz”
8.            Type “unzip master.zip
9.            Type “cd nginx-1.13.1”
9.            Type “sudo chmod 777 /root” command for read write permission to root directory.
10.          Type “./configure --with-http_ssl_module --add-module=../nginx-rtmp-module-master”
11.          Type “make”
12.          Type “sudo make install”.
13.          To start the server run the following command type “sudo /usr/local/nginx/sbin/nginx”
And to test to make sure nginx is running, point your browser to “http://localhost/ “you should be able to see the default server page.

Step 2: Configure Server

1.       Stop Nginx type “sudo /usr/local/nginx/sbin/nginx -s stop”
2.       Type “sudo chmod 777 /usr/local/nginx” (To provide permissions)
3.       Type “sudo chmod 777 /usr/local/nginx/*” (To provide permissions)
4.       Type “sudo chmod 777 /usr/local/nginx/html”
5.       Type “sudo chmod 777 /usr/local/nginx/html/*”
6.       Type “sudo chmod 777 /usr/local/nginx/conf”.
7.       Type “sudo chmod 777 /usr/local/nginx/conf/*”
8.       Unzip Nginx data .zip file & place in /usr/local/nginx folder overwrite/merge any files if asked.
9.       Cd /usr/local/nginx.
10.   mkdir /HLS
11.   mkdir /HLS/live
12.   START Nginx. Type “sudo /usr/local/nginx/sbin/nginx”
13.   Add nginx in startup type “sudo –i”. Enter Password(password will be invisible) then press enter
14.   Type “nano   /etc/rc.local”
15.   Type “sudo /usr/local/nginx/sbin/nginx”. Press ctrl o, press Enter. Press ctrl x & then press Enter.

Step 3:- Install PHP

1.       Type “sudo add-apt-repository ppa:ondrej/php
2.       Type “sudo apt-get update”
3.       Type “sudo apt-get install php5.6”.
4.       Type “sudo apt-get install php5.6-mysql"
5.       Type “sudo apt-get install mysql-server”
6.       Type  “sudo apt-get install php5.6-fpm php5.6-mysql”
7.       Type  “sudo apt-get install phpmyadmin php5.6-mbstring php5.6-gettext”
8.       Type “sudo chmod 777 /etc/php/5.6/fpm/pool.d” .
9.       Type “sudo chmod 777 /etc/php/5.6/fpm/pool.d/www.conf”
10.   Replace the file www.conf with  “NginxData/ETC_PHP_5.6_FPM_POOL.D/www.conf”
11.   How to check mysql is running on Ubuntu.
12.   Run command in terminal mysql –u root –p
13.   Enter password 123 as you given.
14.   Select * from login;
15.   Select * from user;
16.   Use DELTA;
17.   select * from user show database

Step 4:- Insert database from file


1.       Please change the apache port 80 to 81 from \etc\apache2\ports.conf & restart apache server.
2.       Run in web browser insert.php file. (localhost/svr/insert.php).
3.       Database created successfully.
4.        
How to allow firewall for rtmp in Ubuntu.
1.       sudo ufw limit ssh
2.       sudo ufw allow 80
3.       sudo ufw allow 1935
4.       sudo ufw enable
After restart the controller if your mysql is not running please start nginx server again from below command:-

sudo /usr/local/nginx/sbin/nginx

Thats it.
Thanks